Today we are going to discuss how to integrate R with Spring Boot, using OpenCPU to help you create a personalized portfolio strategy.
Although we are not going into the detail of every aspect of the integration, I’d like to give you an overview of what has to be done, so you can use this tutorial to help you start your project.
I expect you to have a basic understanding of R, spring-boot, docker, kubernetes, apache & jenkins.
R
Many quants and analysts like to work with tools like R or MATLAB : they come with a wide variety of statistical and graphical techniques, including linear and non linear modeling, classical statistical tests, time-series analysis, classification, clustering, etc.
R is available under the GNU General Public License. Moreover, it benefits from a wide community of users, and a lot of packages have been provided and are freely available here.
In one year R moved from the 20th position to the 8th position in the TIOBE index, which measure the popularity of programming languages.
Using R, you can build your own package. A package is a collection of function, their associated documentation and data samples that can be shared with others and loaded easily. We are going to see how to use this functionality to make our lives easier
I already gave a basic example of how we can use using R to analyse financial data here.
OpenCPU
Although R is a very powerful, tool, it does not offer an out-of-the box integration layer to let Java developers access it through APIs. OpenCPU aims to do just that : it lets you access R through API.
The server is straightforward to install and very easy to use. It supports parallel computing and asynchronous requests by design. Last but not least, the documentation is clear and does a good job to get you started quickly.
OpenCPU is not the only solution available : you might also want to have a look at {plumber} that is a very nice alternative.
So what are we going to do ?
We are going to create an interface between R and the consumers. This interface will be composed of a java facade that will delegate calls to our OpenCPU server.
The facade responsibility will be :
- Making sure that the user is allowed to use our service.
- Forward authorized calls to the openCPU server.
- Transform the data returned by openCPU into JSON and handle errors.
We are not going to add too much constraints : our strategy will require an account number and a strategy name. Based on this we’ll let the creator of the strategy decide on what he wants to return: formatted JSON, or free text.
The facade will be done using spring boot and added, together with the OpenCPU application, to a docker container, that will be deployed on a kubernetes cluster by a Jenkins pipeline.
The facade will expose three entry points :
- GetAllocationForAccountAndStrategy will take in an account and a strategy name and return a recommended allocation (relative to S&P sectorial allocation) for the given portfolio
- GetStockPickingForAccountAndStrategy will take in an account and a strategy name and return a list of stocks suitable for the given portfolio (based on S&P composition)
- doForAccountAndStrategy will take in an account and a strategy name and return unformatted JSON
In this tutorial, we will focus on the third use case.
Technical & application architecture
Our new application will integrate an existing ecosystem. Of course we are not going to detail all elements here, but let’s start with a short description of the main elements to let you understand the context.
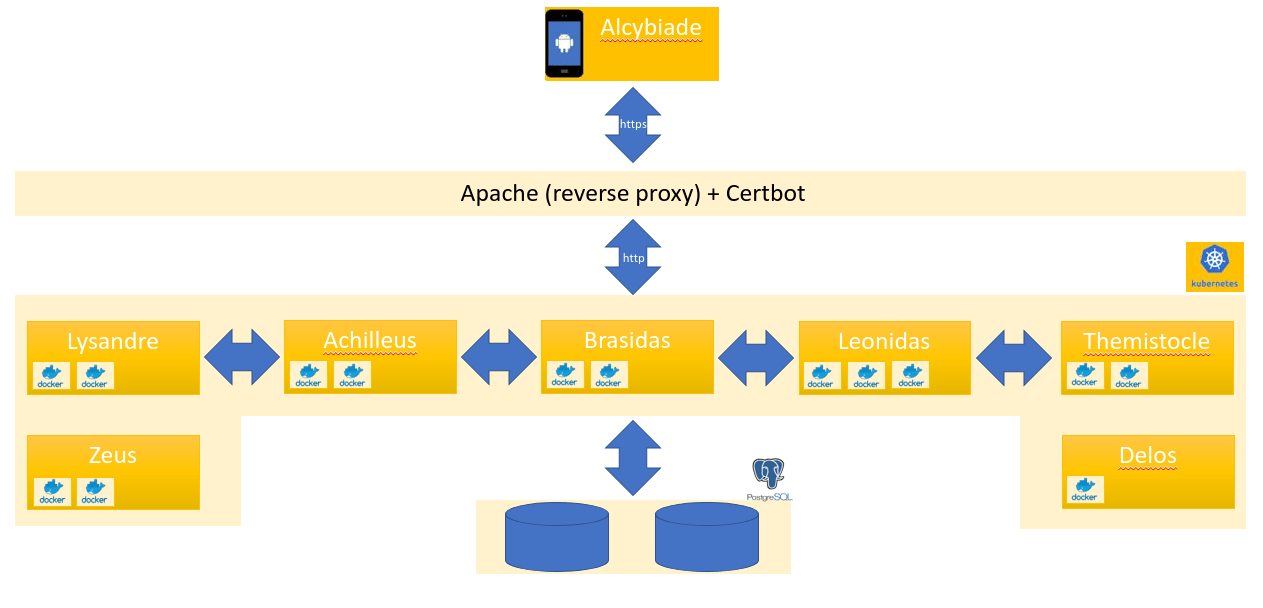
Main applications are :
- Alcibiade, a mobile application, to access all referentials, create portfolios, benchmarks, backtest allocation and stock picking strategy.
- Apache as a reverse proxy, with Certbot to take care of TLS certificate creation / automatic renewal
- Lysandre, the account referential
- Achilleus, our new R application
- Brasidas, facade for the product referential (Delos).
- Leonidas, the position referential.
- Delos, the product referential, feeded daily with market data, not exposed.
- Zeus, the identity manager (OAuth 2 & JWT token)
The data we’ll use is stored in a cluster of PostgreSQL databases. The database lifecycle is managed by flywaydb scripts. Every application encapsulates its own data and manage access through API exposition. When it is not possible (e.g. for performance issue) read access is authorized through dedicated views (or materialized views). Direct access to database for writing is never allowed.
Finally, security is managed by a custom spring security filter : all applications validate the mandatory JWT token that has to be provided with all requests, by calling Zeus.
Jenkins Pipeline
Jenkins will first build and release our project (using maven-plugin-release). Then the pipeline will create the docker image, push it to dockerhub and update the Kubernetes deployment on our cloud.
You can download a very simple example of such a pipline here.
The kubernetes service
We start by creating a basic service in kubernetes. Don’t worry, we don’t need to have running pods to start a service as they work with selectors. As soon as we will create our deployment. pods with the label corresponding to the selector will appear, the service will detect them and use them as endpoints : that’s the magic of kubernetes
Your service skeleton should look like this :
apiVersion: v1
kind: Service
metadata:
  name: nblotti-achilleus
spec:
  selector:
    app: nblotti_achilleus
  type: NodePort
  ports:
    - protocol: TCP
      port: 8080
      targetPort: 8080
You can now start it and get a description of the service :
kubectl apply -f initial-service.yaml
kubectl describe service

The NodePort value is very important, it’s the port we are going to use to access our service. Your endpoints should be empty : they will appear once we create our deployment later on.
The reverse proxy
Now that we created our kubernetes service, we need to be able to access it from the outside world. We are going to configure our reverse proxy to forward all requests for https://achilleus.nblotti.org/* to our newly created kubernetes service.
First of all we create a virtual host in apache by creating a configuration file
vi /etc/apache2/sites-available/org.nblotti.achilleus.conf The name of the file is the reverse url of your site + .conf. In that case achilleus.nblotti.org.conf. Once the file is created, we add a VirtualHost tag :
<VirtualHost *:80>
...
ServerName achilleus.nblotti.org
...
ProxyPreserveHost On
ProxyPass / http://10.0.0.155:32172/
ProxyPassReverse / http://10.0.0.155:32172/
</VirtualHost>
The port here is the NodePort value we just talked about. The IP is the internal IP of your kubernetes master. You can also use apache balancer to to load balance and failover among your kubernetes masters instead of forwarding to a single one as in this simplified example.
Now we activate the virtual host and reload apache :
sudo a2ensite org.nblotti.achilleus.conf
systemctl reload apache2
Finally, we create the TLS certificate using certbot. I am not going to describe the whole process as you will find plenty of examples by yourself. Just make sure you force all requests to be redirected to https. Certbot will handle your certificate renewal, so you dont’ need to care about it.
sudo certbot

The java application
Now that we configured the reverse proxy and created a kubernetes service, we need to work on the java application. We start with Spring Initializr and generate a Spring Boot application. We make sure to add Spring Security and Spring Web before we generate the project and import it in intellij/eclipse
Once the project is generated, we create two additional folders in our project : one for the R package and one for the DockerFile we’ll use to build our docker image. We also configure the maven-resource-plugin to copy the DockerFile (filtered, we’ll discuss that shortly) and the generated plugin to our target directory.
<resources>
      <resource>
        <directory>${basedir}/src/main/resources</directory>
      </resource>
      <resource>
        <directory>${basedir}/src/main/docker-resources</directory>
        <filtering>true</filtering>
        <targetPath>${project.build.directory}</targetPath>
      </resource>
      <resource>
        <directory>${basedir}/src/main/r-resources</directory>
        <includes>
          <include>**/*.tar.gz</include>
        </includes>
        <targetPath>${project.build.directory}</targetPath>
      </resource>
    </resources>
Next, we configure the maven-release-plugin. We add it to our project plugins and configure our git repository :
   <plugins>
      <plugin>
        <groupId>org.apache.maven.plugins</groupId>
        <artifactId>maven-release-plugin</artifactId>
        <version>3.0.0-M1</version>
      </plugin>
<scm>
<url>https://github.com/nblotti/Achilleus.git</url>
<connection>scm:git:git://git@github.com/nblotti/Achilleus.git</connection>
<developerConnection>scm:git:ssh://git@github.com/nblotti/Achilleus.git</developerConnection>
<tag>Achilleus-0.0.13</tag>
</scm>Now that the project is configured, we’ll work on the security layer to make sure all requests are authorized before being processed by our controller.
We are going to create a new Spring Security filter (jwtAuthorizationFilter) and add it to our filter list. Basically, it will extract the JWT token, request Zeus to validate the signature and then make sure the user has the correct role to access the requested resource. I will not get into details here : it might be a subject for another article.
@EnableWebSecurity
@EnableGlobalMethodSecurity(securedEnabled = true)
public class SecurityConfiguration extends WebSecurityConfigurerAdapter {
....
  @Override
  protected void configure(HttpSecurity http) throws Exception {
    http.cors().and()
      .csrf().disable()
      .authorizeRequests()
      .anyRequest().authenticated()
      .and()
      .addFilter(jwtAuthorizationFilter())
      .sessionManagement()
      .sessionCreationPolicy(SessionCreationPolicy.STATELESS);
  }
...
Now that we took care of the authorization. We need to call our openCPU application. Let’s focus here on the basic use case (raw return) and create a new Spring Boot controller
We create a simple json object containing the strategy name and the account number and forward our call to R using RestTemplate.
...
 String argument = "{\"strategy\":\"%s\",\"account\":%s}";
...
@PostMapping(value = "/")
  public ResponseEntity<String> doForAccountAndStrategy(HttpServletResponse response, @RequestParam String account, @RequestParam String strategy) {
    HttpHeaders headers = new HttpHeaders();
    String body = String.format(argument, strategy, account);
    headers.setContentType(MediaType.APPLICATION_JSON);
    HttpEntity<String> request = new HttpEntity<String>(body, headers);
    return restTemplate.exchange(rServerUrl, HttpMethod.POST, request, String.class);
  }
The docker container
Now that the java part is done, let’s work on the Docker image. First, we need to create a DockerFile to describe our container.
FROM opencpu/rstudio:latest
COPY *.tar.gz nblottirstrategyproxy.tar.gz
RUN R -e "install.packages(\"nblottirstrategyproxy.tar.gz\", repos = NULL, type=\"source\")"
RUN R -e "install.packages(\"devtools\")"
RUN R -e "devtools::install_github(\"braverock/PerformanceAnalytics\")"
COPY Rprofile /usr/lib/R/library/base/R/Rprofile
COPY myStartupScript.sh /usr/local/myscripts/myStartupScript.sh
RUN apt-get update && apt-get install -y openjdk-11-jdk
# Setup JAVA_HOME -- useful for docker commandline
ENV JAVA_HOME /usr/lib/jvm/java-11-openjdk-amd64/
RUN export JAVA_HOME
ARG JAR_FILE=@project.artifactId@-@project.version@.jar
COPY ${JAR_FILE} app.jar
EXPOSE 8080
CMD ["/bin/bash", "/usr/local/myscripts/myStartupScript.sh"]
We start from the latest opencpu/rstudio image and copy and install our new R package (more on that in the next section).
We’ll add the PerformanceAnalytics package. It’s a « collection of econometric functions for performance and risk analysis« . It contains functions to calculate VaR, Sharpe Ratio, CAPM, Skewness, Std dev. etc. that will be very useful.
Now that configuration of rstudio is done, we need to add jdk11, that is a prerequisite to run our spring boot application.
Then we copy the generated jar and launch our custom startup script. The script will start apache (openCPU) and our spring boot application. It is generally recommended that you separate areas of concern by using one service per container, but we’ll keep it simple for our example. For further info, please read this or this.
COPY myStartupScript.sh /usr/local/myscripts/myStartupScript.sh
source /etc/apache2/envvars
/usr/sbin/apache2 -DFOREGROUND &
java -jar app.jar
Note that @project.artifactId@-@project.version@ will be filtred and replaced with the correct value by the maven-resource-plugin.
We also copy a custom Rprofile to make sure our packages are loaded and available.
.First <- function()
{
    library("devtools")
    library("PerformanceAnalytics")
}
The R package
A lot of work have been done. We are finally ready to start the last part of our tutorial : create our own package using RStudio.
Let’s open RStudio and create a new project in the r-resources directory of our java application : we’ll benefit from our project versioning and link our plugin lifecycle with the project release.
We select « New Directory », « R package » and fill the requested info.


Once the project has been created, we open the generated « Description » file and complete it.
Package: nblottirstrategyproxy
Type: Package
Title: Strategy proxy
Version: 0.1.0
Author: Nicholas Blotti
Maintainer: Nicholas Blotti <nblotti@gmail.com>
Description: This package acts as a wrapper for all financial strategies function available in Alcibiade application
License: GPL
Encoding: UTF-8
LazyData: true
We are going to expose only one generic function. This function will then delegate to the correct strategy, based on the name provided. So we need to create the function and to tell R to expose it to the outside world.
We start by opening the R/main.R file and creating a doOperation operation.
This function responsibility is to « instantiate » the requested strategy, and calls it with the account number it received as the second parameter.
#' Call a strategy based on it's name
#'
#' @param strategy The name of the strategy to call
#' @param account An account number
#' @return unformatted data
#' doOperation(1)
doOperation <- function(strategy,account) {
  f <- get(strategy)
  return(f(account))
}
As the function will be exposed, we also make sure to create a function documentation. Open the man/main.Rd file and complete the description.
\name{doOperation}
\alias{doOperation}
\title{doOperation}
\usage{
doOperation(strategy,account)
}
\arguments{
  \item{strategy}{The name of the strategy to call}
  \item{account}{An account number}
}
\description{
execute a strategy.
}
\examples{
doOperation("testrnorm",200)
}
Finally, we need to tell R to export it. We have to modify the NAMESPACE file.
exportPattern("doOperation")
importFrom("stats", "rnorm")
Once the « proxy » has been done, we need to create the strategy function that will be invoked after it’s name has been given as a parameter to our doOperation function. In the real life, this is where you add your « secret sauce », using the libraries we imported with docker and access to your database and referentials. For this example, we are going to generate and return a sample of size of « account » from a standard normal distribution (with mean 2).
We create a second file in our R directory and call it testrnorm.R. In this file, we define a single function and call it testrnorm. The name of the function is the value we need to pass as first parameter when we’ll call our API. The function calls R rnorm function and return its result.
testrnorm <- function(account) {
  return( rnorm(account, 2))
}
Et voilà ! We can now compile our package using « Build », « Build Binary Package » to generates our tar.gz. Remember ? We configured maven-resource-plugin and docker to copy and load it into R when we start our Docker image.


Now let’s commit our project, build and release it, build a docker image and push it to dockerhub. You can use a Jenkins pipeline to do all this.


We are now ready to deploy it to our kubernetes cluster.
The kubernetes deployment
We are almost done, but we still need to create a kubernetes deployment. So let’s create a deployment skeleton :
apiVersion: apps/v1
kind: Deployment
metadata:
  name: nblotti-achilleus
  labels:
    app: nblotti_achilleus
spec:
  replicas: 1
  selector:
    matchLabels:
      app: nblotti_achilleus
  template:
    metadata:
      labels:
        app: nblotti_achilleus
    spec:
      containers:
        - name: nblotti
          image: nblotti/achilleus:v0.0.1
          ports:
            - containerPort: 8080
      imagePullSecrets:
        - name: regcred
As my DockerHub repository is private, I use a regcred to allow kubernetes to download the image.
We apply our deployment and wait for our pod to be downloaded and started :
kubectl apply -f initial-deployment.yaml
watch kubectl get pods

We can watch our pod startup logs (replace with your actual pod name) :
kubectl logs -f nblotti-achilleus-797d9bc457-9gqzgIt should also appear as an endpoint in our service. To verify it, let’s get a description of our service :
kubectl describe serviceLet’s try it !
Now everything is ready. Let’s open Postman and try our new service. We make sure to add a valid JWT token,


And we get :
[
    2.7316,
    0.6155,
    0.9366,
    2.4065,
    1.4401,
    3.0886,
    2.7695,
    2.5754,
    3.6436,
    0.6344
]
We can easily and quickly scale our kubernetes deployment with the command :
kubectl scale deployment nblotti-achilleus --replicas=2


I hope this was useful. Next time we are going to discuss how we can integrate our new project with Alcibiade and Leonidas to create a product like TrueWealth.
Laisser un commentaireAnnuler la réponse.