We have already discussed the first three states of our application topology (Figure 1) in previous articles. Now, we are ready to start streaming quotes.
Today, we will implement the initial part of the « init streams » state and learn how to use Debezium and Confluent JDBC Connector to capture changes in our database and stream them to another database.

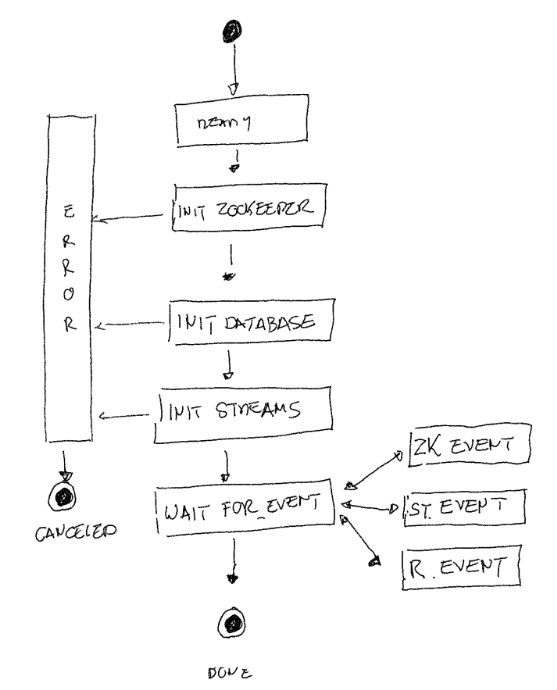
Figure 1 : Application topology
Kafka & Kafka Streams
It is common for applications to operate in isolation, each using data stored in their own relational databases and performing batch processing during the night. After these batches are completed, the data is exported to a data warehouse where management reports become available. When applications need to interact more frequently, data is exchanged point-to-point via file exports or APIs. This method has several drawbacks: data is not available immediately, leading to high latency in reporting, and the architecture quickly devolves into a tangled « spaghetti » structure as new applications are added

Figure 2 : A classical « spaghetti » architecture
Apache Kafka aims to simplify communication models by serving as a central communication hub that supports real-time decision-making. As a publish/subscribe system, Kafka allows producers to generate unidirectional streams of immutable key-value pairs representing events, which subscribers can then consume.
Kafka is not just an extremely efficient event bus; it also has the capability to use streams of events to reconstruct states, similar to how a database uses a transaction log to apply changes to a table. Furthermore, Kafka provides a high-level DSL (Domain Specific Language) to manipulate these streams. This DSL includes stateless operators such as filter, branch, and join, as well as stateful operators like join, group, and aggregate. Don’t worry—we’ll dive deeper into Kafka’s concepts in the next article.
I won’t be delving into the Kafka installation process in this guide. If you’re using Ubuntu, you can follow this tutorial or simply search online for other guides
Kafka connect
Kafka Connect is used to create connectors that integrate existing systems with Kafka. There are two types of connectors:
- Source Connector: Ingests entire databases and streams table updates to Kafka topics. A source connector can also collect metrics from all your appli-cation servers and store these in Kafka topics, making the data available for low-latency stream processing.
- Sink Connector: Delivers data from Kafka topics into secondary indexes such as PostgreSQL, or batch systems like Hadoop for offline analysis.
Creating a Kafka Connect source or sink connector is as simple as writing a JSON configuration and using curl to post it to your Connect cluster’s URL.
Configuration
Adapt the connect configuration file in your Kafka config directory. Set the following properties :
# Bootstrap Kafka servers. If multiple servers are specified, they should be comma-separated.bootstrap.servers=kafka1:9092,kafka3:9092# The group ID is a unique identifier for the set of workers that form a single Kafka Connect# clustergroup.id=connect-cluster# The Hostname & Port that will be given out to other workers to connect to i.e. URLs that are routable from other servers.rest.advertised.host.name=kafka1rest.advertised.port=8083plugin.path=/home/kafka/kafka/connect
Figure 3 :Kakfa Connect configuration
Ensure that you remember the plugin path. Now that Kafka Connect is configured, we will integrate it with the system. To do this, let’s create and enable a new service. Begin by creating a Kafka Connect service file in the /lib/systemd/system/ directory.
[Unit]Description=After=network.target[Service]Type=simpleExecStart=/home/kafka/kafka/bin/connect-distributed.sh /home/kafka/kafka/config/connect-avro-distributed.properties[Install]WantedBy=multi-user.target~
Figure 4 :Kafka Connect service description
Then enable and start the service
  sudo systemctl start kafka-connect.service
  sudo systemctl status kafka-connect.service
  sudo systemctl enable kafka-connect.service
Figure 5 :Start and enable the service
Debezium connector for PostgreSQL
Let’s employ Debezium’s PostgreSQL connector as our source connector. This particular connector is designed to capture row-level changes within a PostgreSQL database. It generates data change event records and streams these records to Kafka topics. By default, for each table, the connector streams all generated events to a distinct Kafka topic dedicated to that table.
Installation
Please follow these steps:
- Download the connector from the provided link.
- Extract the downloaded files.
- Add the directory containing the extracted JAR files to Kafka Connect’s plugin.path.
- Restart your Kafka Connect process to ensure it recognizes and loads the new JAR files.
- Make sure your PostgreSQL is set up to run the Debezium connector.
Confluent JDBC Connector
We will utilize the Confluent JDBC Connector as a sink connector. This connector will serve to export data from the Kafka topics, which are populated by the source connector, into the database that was previously configured in our topology.
Installation & configuration
Create a new directory in the Kafka Connect’s plugin.path. Download and extract the confluent-hub-client-latest.tar.gz file. Additionally, download the most recent PostgreSQL JDBC driver into the same directory. Finally, restart your Kafka Connect process to ensure it recognizes the new JAR files.
Test it !
Let’s compose a description for a source connector. Ensure that you substitute the necessary connection details with your specific values
{ "name": "kafa-stock-quote-connector", "config": { "connector.class": "io.debezium.connector.postgresql.PostgresConnector", "database.hostname": "10.0.0.252", "database.port": "5432", "database.user": "xxxx", "database.password": "xxxx", "database.dbname": "securities", "database.server.name": "securities_server", "transforms": "Reroute", "transforms.unwrap.type": "io.debezium.transforms.ExtractNewRecordState", "transforms.Reroute.type":"io.debezium.transforms.ByLogicalTableRouter", "transforms.Reroute.topic.regex":"(.*)", "transforms.Reroute.topic.replacement":"stock_quotes", "plugin.name": "pgoutput", "time.precision.mode": "connect", "table.include.list": "public.stock_monthly_quote", "value.converter":"org.apache.kafka.connect.json.JsonConverter", "value.converter.schemas.enable": "true", "key.converter":"org.apache.kafka.connect.json.JsonConverter", "key.converter.schemas.enable": "true" }}
Figure 6 :Source Connector description
Post it and check the connector is up & running :
curl -X POST -H "Content-Type: application/json" --data @kafa-stock-quote-connector.json http://kafka1:8083/connectors
Figure 7 :Use curl to post your source connector description
Ensure that a task is assigned to your connector and verify that the connector element is not left empty.
curl http://kafka1:8083/connectors/kafa-stock-quote-connector | jq % Total % Received % Xferd Average Speed Time Time Time Current Dload Upload Total Spent Left Speed100 1000 100 1000 0 0 15151 0 --:--:-- --:--:-- --:--:-- 15151{ "name": "kafa-stock-quote-connector", "config": { "connector.class": "io.debezium.connector.postgresql.PostgresConnector", "database.user": "xxx", "database.dbname": "securities", "transforms.Reroute.type": "io.debezium.transforms.ByLogicalTableRouter", "transforms": "Reroute", "time.precision.mode": "connect", "database.server.name": "securities_server", "transforms.Reroute.topic.regex": "(.*)", "database.port": "5432", "plugin.name": "pgoutput", "key.converter.schemas.enable": "true", "transforms.Reroute.topic.replacement": "stock_monthly_quote", "database.hostname": "10.0.0.252", "database.password": "postgres", "value.converter.schemas.enable": "true", "name": "kafa-stock-quote-connector", "transforms.unwrap.type": "io.debezium.transforms.ExtractNewRecordState", "table.include.list": "public.stock_monthly_quote", "value.converter": "org.apache.kafka.connect.json.JsonConverter", "key.converter": "org.apache.kafka.connect.json.JsonConverter" }, "tasks": [ { "connector": "kafa-stock-quote-connector", "task": 0 } ], "type": "source"}
Figure 8 : The source connector status
Now proceed to create the sink connector. As before, ensure that you replace the database connection details with your own specific values:
{ "name": "kafa-stock-quote-sinkconnector", "config": { "connector.class": "io.confluent.connect.jdbc.JdbcSinkConnector", "tasks.max": "1", "connection.url": "jdbc:postgresql://xxx.coenmrmhbaiw.us-east-2.rds.amazonaws.com:5432/securities", "topics": "stock_monthly_quote_filtred", "connection.user": "xxx", "connection.password": "xxx", "transforms": "unwrap", "transforms.unwrap.type": "io.debezium.transforms.ExtractNewRecordState", "transforms.unwrap.drop.tombstones":"false", "table.name.format":"stock_monthly_quote", "insert.mode": "upsert", "delete.enabled": "true", "pk.mode": "record_key", "pk.fields": "id", "value.converter":"org.apache.kafka.connect.json.JsonConverter", "value.converter.schemas.enable": "true", "key.converter":"org.apache.kafka.connect.json.JsonConverter", "key.converter.schemas.enable": "true" }}
Figure 9 : The sink connector description
Post it and check the connector is up & running :
curl -X POST -H "Content-Type: application/json" --data @kafa-stock-quote-connector-sink.json http://kafka1:8083/connectors
Figure 10 : Use curl to post your sink connector description
curl http://kafka1:8083/connectors/kafa-stock-quote-connector-sink | jq
  % Total    % Received % Xferd  Average Speed   Time    Time     Time  Current
                                 Dload  Upload   Total   Spent    Left  Speed
100   970  100   970    0     0  48500      0 --:--:-- --:--:-- --:--:-- 48500
{
  "name": "kafa-stock-quote-connector-sink",
  "config": {
    "connector.class": "io.confluent.connect.jdbc.JdbcSinkConnector",
    "table.name.format": "stock_monthly_quote",
    "connection.password": "xxx",
    "tasks.max": "1",
    "topics": "stock_monthly_quote",
    "transforms": "unwrap",
    "key.converter.schemas.enable": "true",
    "delete.enabled": "true",
    "connection.user": "xxx",
    "transforms.unwrap.drop.tombstones": "false",
    "value.converter.schemas.enable": "true",
    "name": "kafa-stock-quote-connector-sink",
    "transforms.unwrap.type": "io.debezium.transforms.ExtractNewRecordState",
    "connection.url": "jdbc:postgresql://xxx.coenmrmhbaiw.us-east-2.rds.amazonaws.com:5432/securities",
    "value.converter": "org.apache.kafka.connect.json.JsonConverter",
    "insert.mode": "upsert",
    "pk.mode": "record_key",
    "key.converter": "org.apache.kafka.connect.json.JsonConverter",
    "pk.fields": "id"
  },
  "tasks": [
    {
      "connector": "kafa-stock-quote-connector-sink",
      "task": 0
    }
  ],
  "type": "sink"
}
Figure 11 : The sink connector status
Utilize your preferred tool to input data into the table (Figure 12). You should then observe that it is reflected in your target database (Figure 13).
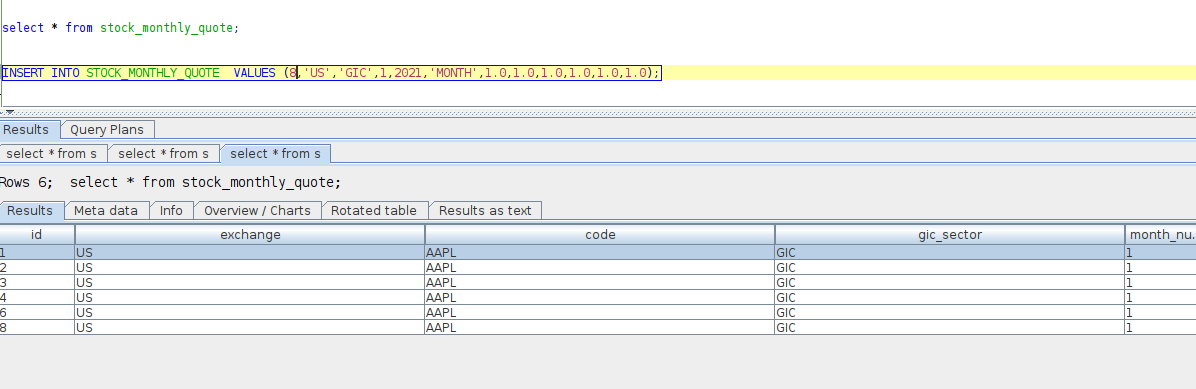
Figure 12 : Insert data in your source database
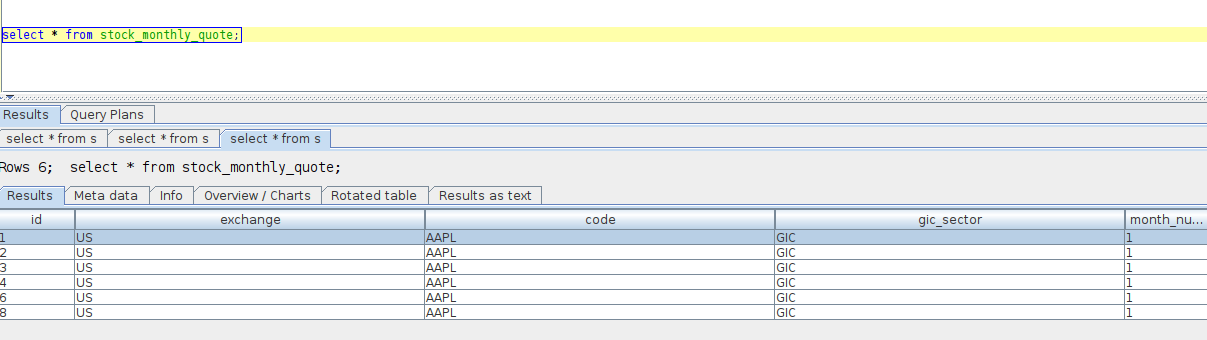
Figure 13 : The data is replicated in your target database
That concludes today’s session! Next time, we will delve into using Kafka Streams and incorporate both stateless and stateful operators to filter streamed events. Additionally, we will learn how to dynamically create a connector based on information retrieved from Zookeeper.
Laisser un commentaireAnnuler la réponse.